Actions During the Meeting
Applies to:
- Admin Assistant
- Committee Co-Chair (a worker and an employer)
- Committee Members with meeting recorder privileges.
Starting the Meeting
The Co-Chair, Admin Assistants or Recorders are responsible for starting the meeting by confirming attendance. However, they can update the attendance at any point during the meeting and after the meeting is adjourned on ‘Edit Minutes’ screen (before publishing the minutes). If a quorum is not met, the meeting will still proceed, and the participants will still be able to make decisions.
To do this:
- Click the ‘Dashboard’ tab on the page header.
- Click on the committee’s name and the ‘Meeting & Actions’ link.
- Click ‘New Meetings.’
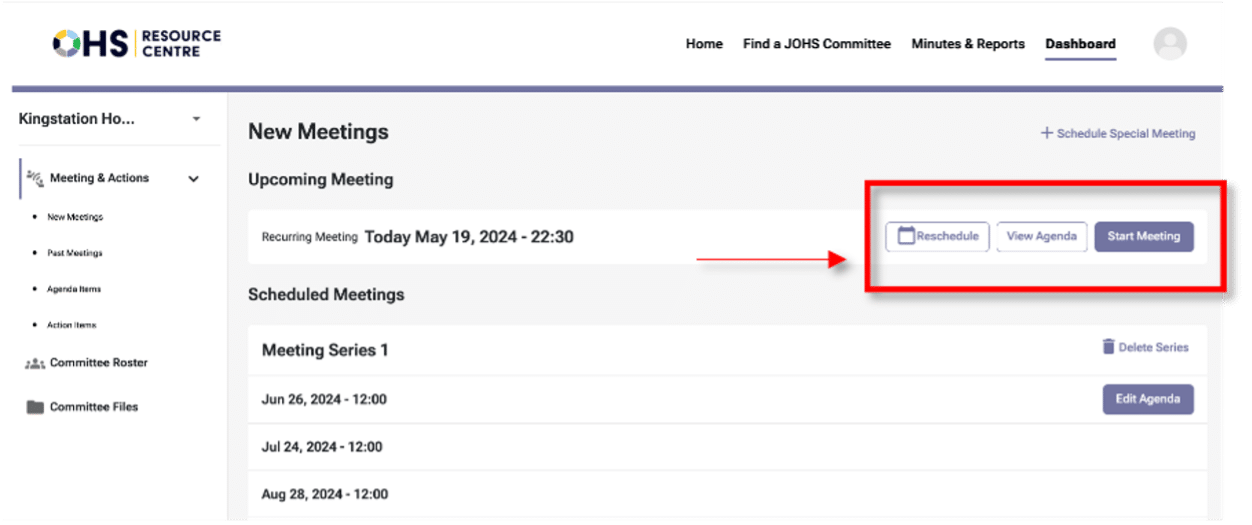
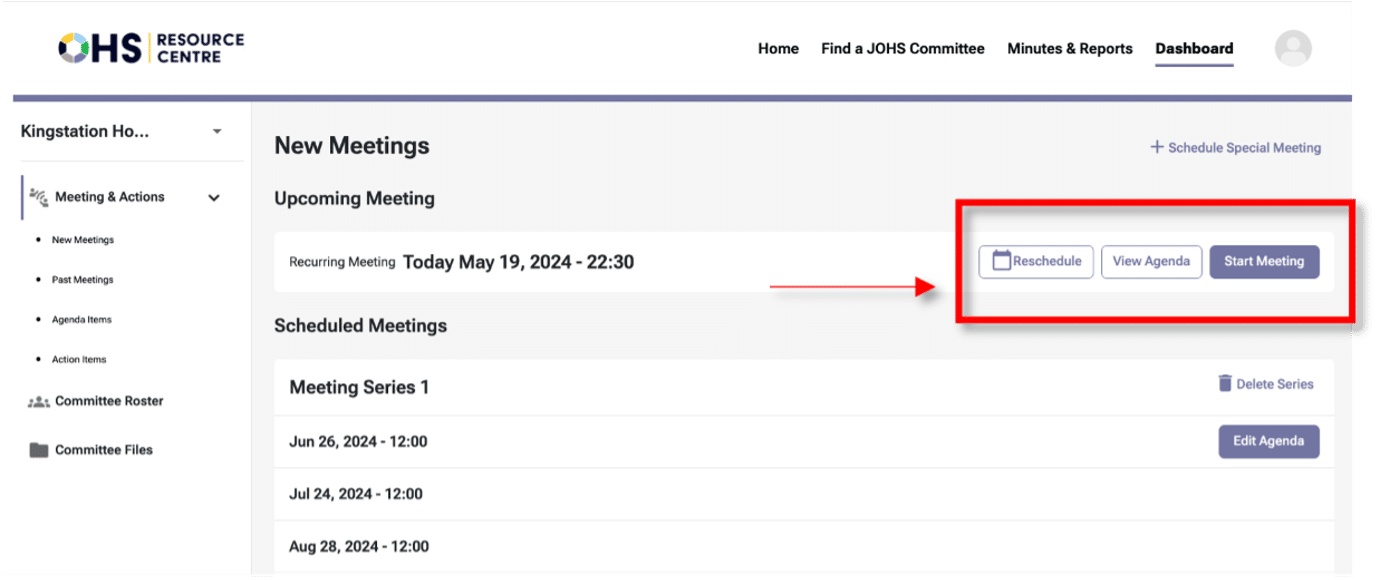
- Click ‘Start Meeting’ at the top of the screen.
Note
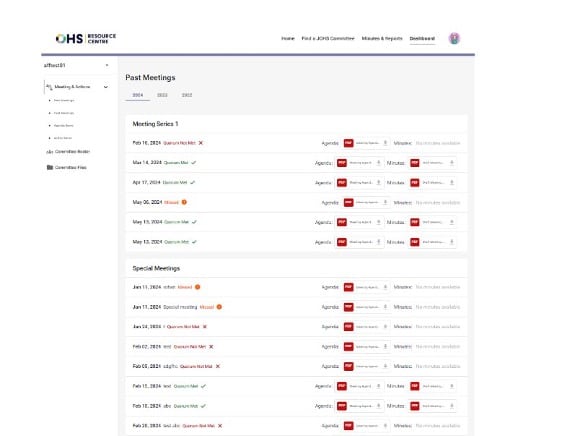
The ‘Start Meeting’ button is available 24 hours before and after the scheduled meeting time. If not used, the meeting will move to ‘Past Meetings’ and be marked as missed. Co-chairs can reschedule within the same calendar month; after that, the meeting will be marked as ‘missed’ and cannot be rescheduled.
- A pop-up box will appear to confirm the meeting start. If you selected this button by mistake, you would have the option to go back.
Check Attendance
- After clicking ‘Yes, Start Meeting’, you will be directed to the ‘Current Meeting’ page. Manually add attendees by selecting the ‘Present’ buttons in the ‘Attendance & Quorum’ section (below screenshot box number 1).
- The ‘Current Meeting’ page defaults to ‘quorum not met’. In the screenshot, the ‘Attendance & Quorum’ section is highlighted as number 1. If a quorum is not met, you have the option to ‘Adjourn Meeting.’ Alternatively, if participants still wish to proceed without quorum, the meeting can continue. In this case, the meeting minutes will indicate ‘quorum not met.’ You can still decide which agenda items to review, postpone, or take other actions on, and add or update action items.
Note
You can update the attendance after the meeting is adjourned on the ‘Edit Minutes’ screen (before publishing the minutes).

Check and Approve the Agenda
- A button labeled “Approved?” will appear regardless of whether quorum is met. This button is simply part of the regular committee process to approve the agenda and does not have any functional purpose linked to it.
Note
If not manually adjourned, the system will automatically adjourn the meeting 24 hours after the meeting start.

Add and Update Agenda Items
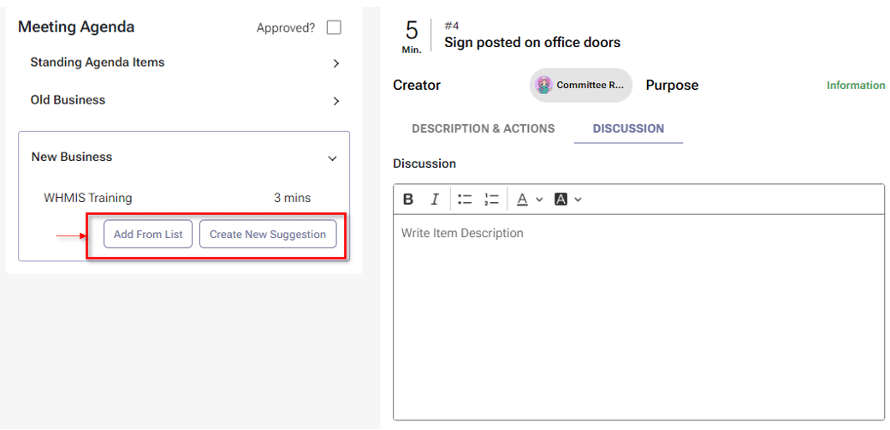
- As the meeting discussion moves forward, the primary meeting recorder should use the ‘Add from List’ and ‘Create New Suggestions’ options in the ‘New Business’ section to include additional agenda items for discussion (refer to the screenshot below). The primary recorder should also take notes in the ‘Discussion’ field and add any relevant files or action items during the discussion. Detailed instructions on how to do this will be provided later, with an example in the ‘Old Business’ section.’
Note
If new suggestions are added during the meeting, the recorder will be listed as the owner of the new agenda items. You can enter the name of the actual task owner in the ‘Discussion’ form.
Once the agenda item has been discussed, the recorder can decide the status of agenda items by selecting one of the following options (more detail will be explained later in this manual):
- Postpone: if a decision has not been made or needs further discussion, the recorder can postpone it by # month(s) to review it in a later meeting. The item will automatically populate on the agenda for the meeting month you selected, but the system allows you to manually add it to an agenda if the committee wishes to discuss it earlier.
Note: A long-running agenda item is an agenda item that has been postponed more than three months (default), but that can be adjusted by the committee co-chairs to up to 12 months. - Carry Forward to Next Meeting: If a decision has not been made or needs further discussion, and the committee decides to review it in the next meeting, the agenda item will automatically appear on the agenda for the next meeting.
- Complete: If the agenda item discussion has no outstanding items to cover.
- Reject Agenda item: if the committee decides that the agenda item is not necessary or relevant anymore.
Note
If an agenda has an open action item, you cannot complete or reject the agenda item. The action item(s) will need to be completed or cancelled.
- Depending on how the recorder facilitates the meeting, they can move to the next section of business, in the example below, the recorder selected to move onto ‘Old Business’ (see highlighted box).
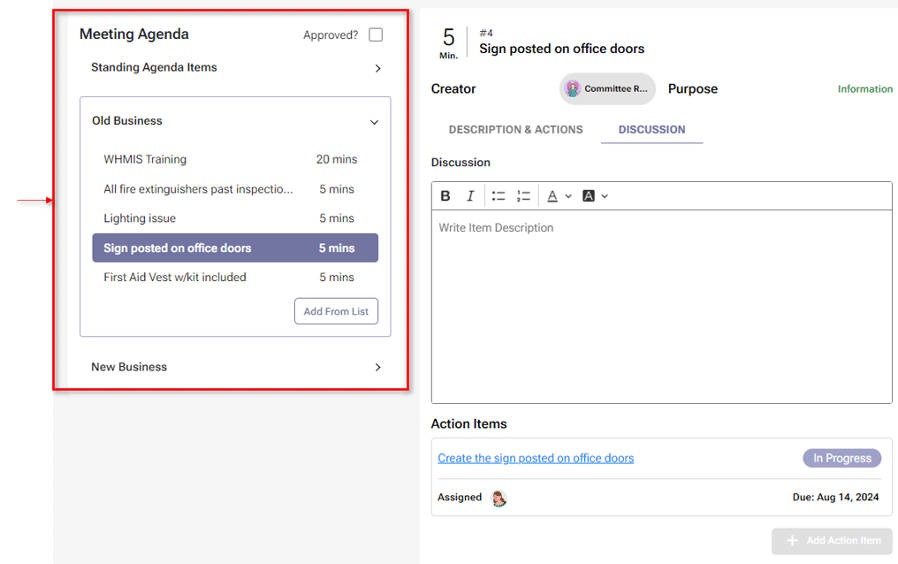
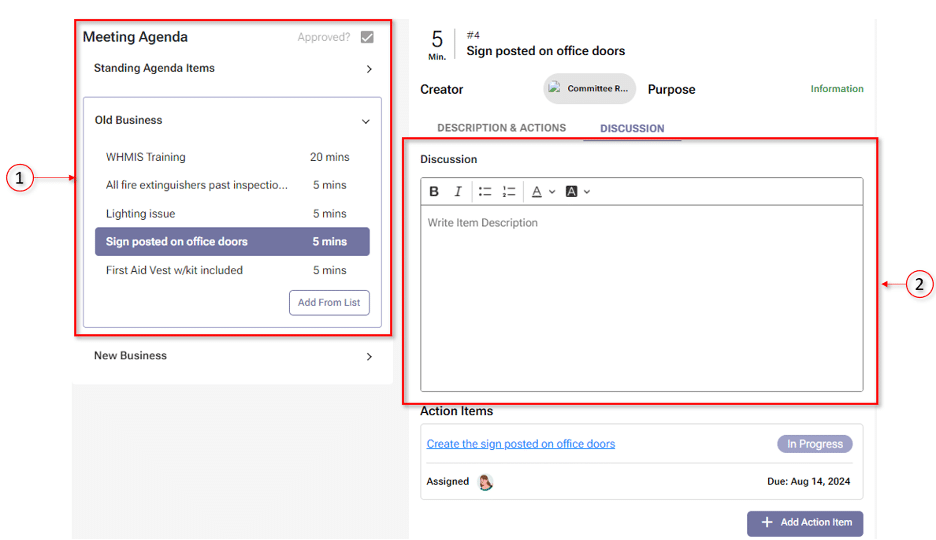
- In the ‘Old Business’ section, select the item to be discussed. This will highlight the item (see below screenshot, highlighted box number 1), and open the ‘Discussion’ box for you to capture the discussion notes (see number 2). The ‘Discussion’ box has a 2000-character limit.
- From this form, you can add action items (highlighted box number 2). When you select ‘+Add Action Item’ a pop-up box will appear where you can leave details on the action items.
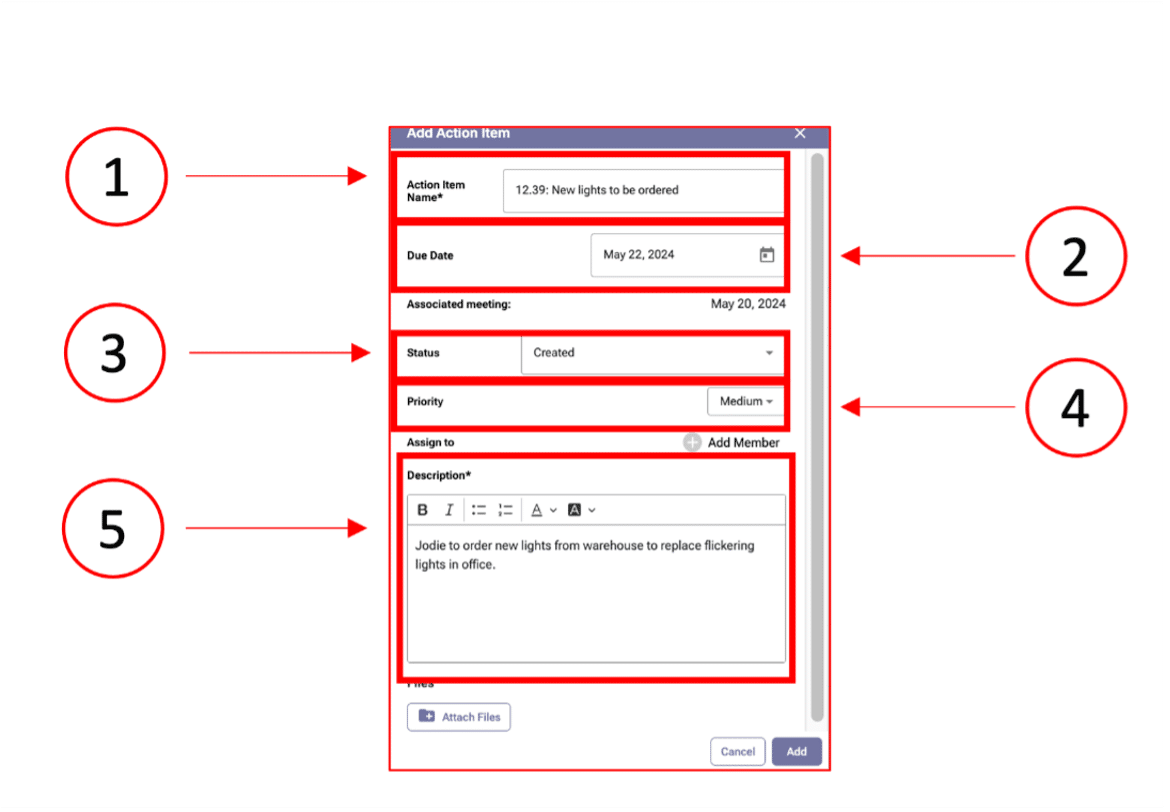
- In the pop-up box that appears after you select ‘+Action Item’, complete the pop-up box as thoroughly as possible to ensure that the action item can be clearly understood and communicated to those responsible. As you will see in the screenshot below:
- Highlighted box number 1 displays the name of the action item.
- Highlighted box number 2 displays the due date of the action item
- In highlighted box number 3, you can choose from a range of options that matches the status of the action item (e.g., ‘Created’, ‘Assigned’, ‘Completed’ etc.).
- In highlighted box number 4, the recorder should mark the action item according to its agreed priority level,
- In highlighted box number 5, the system allows the recorder to capture description/discussion notes.
- In this pop-up box, the recorder can also attach files, add member(s) who are responsible for the task, and cancel/add the task to the record.
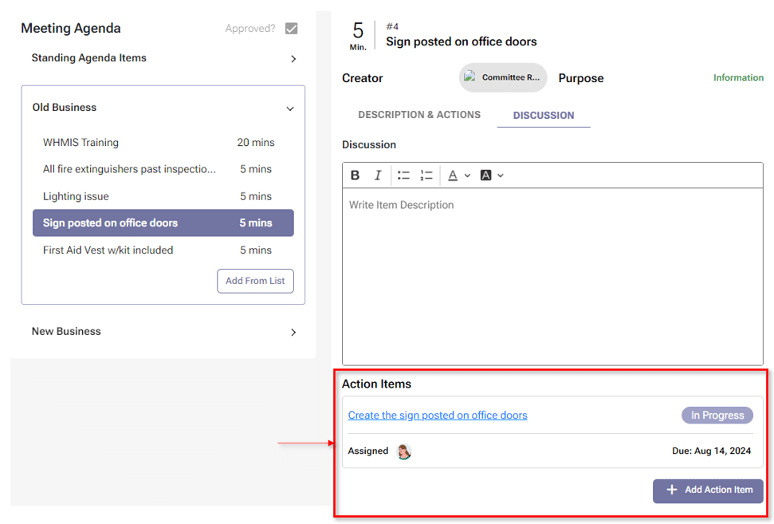
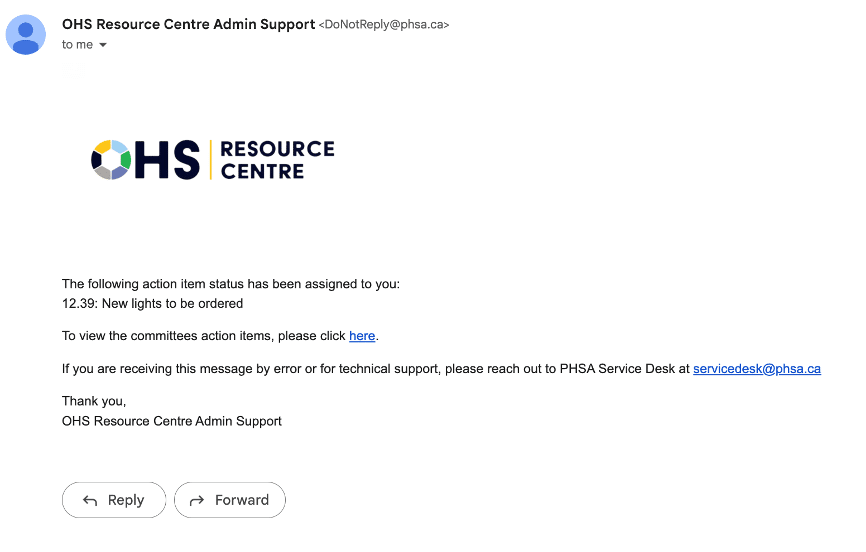
- Once the action has been added, as is shown in the screenshot, the action item is recorded in the ‘Action Items’ section. Committee members assigned to this action item will also receive an email confirming the task and providing details (see second screenshot below).
Note
Action items can be added under any agenda items: Standing, Old, or New Business.
Reject Agenda item
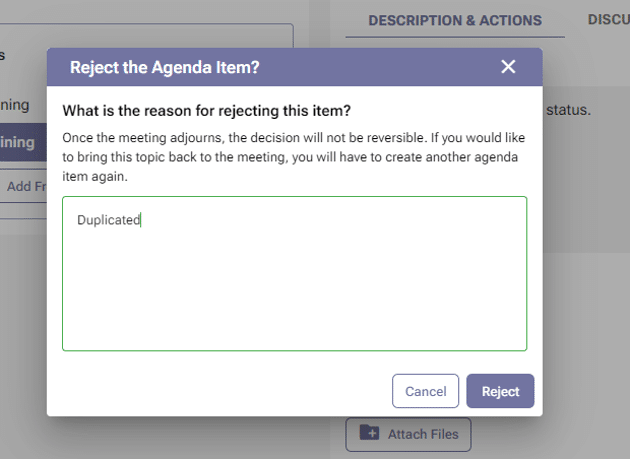
- Select ‘Reject Agenda Item’ to remove an agenda item. Once this option is selected, a pop-up box will appear.

- In the pop-up box, leave as much detail as possible as to why this item is to be rejected from the meeting agenda. After completing the description, select the ‘Reject’ button. If a pop-up appears at the top of the screen that states, ‘Cannot reject or complete agenda item. Please close all agenda action items.’ This is because all action items associated with agenda items must be closed (closed means either being completed or cancelled).
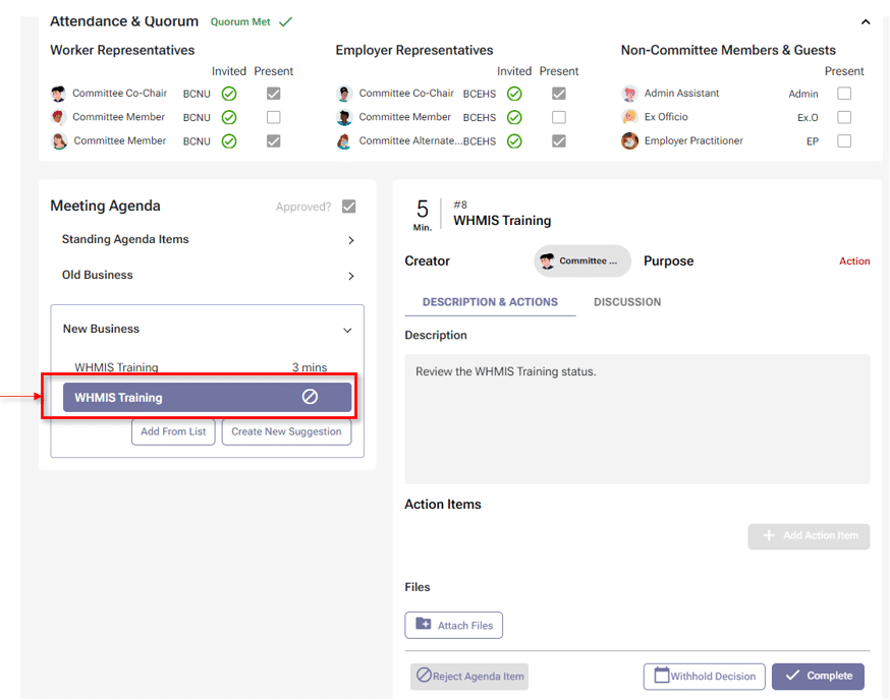
- Once the item has been rejected, a rejected icon will appear next to it (see screenshot).
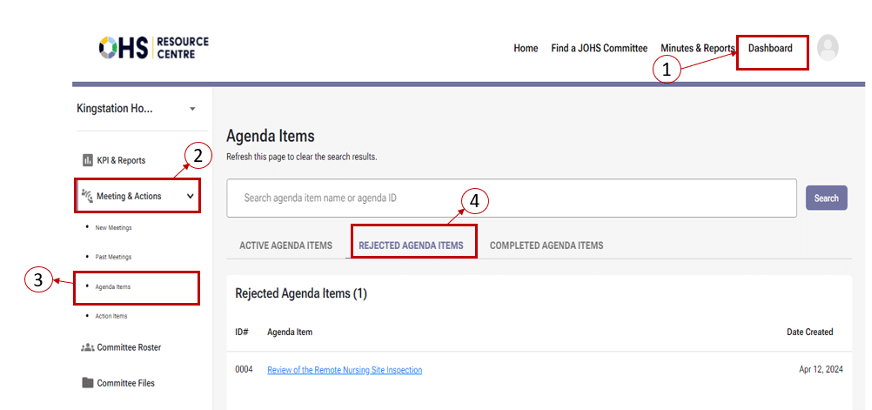
- In addition, you can also check all the rejected agenda items with the following structure:
- Click the ‘Dashboard’ tab on the page’s header.
- Click on the committee’s name you want to check the rejected agenda items, and then click on the ‘Meeting & Actions’ link.
- Click on the ‘Agenda items’ link and select the ‘Rejected Agenda Items’ tab.
Postpone an Agenda Item
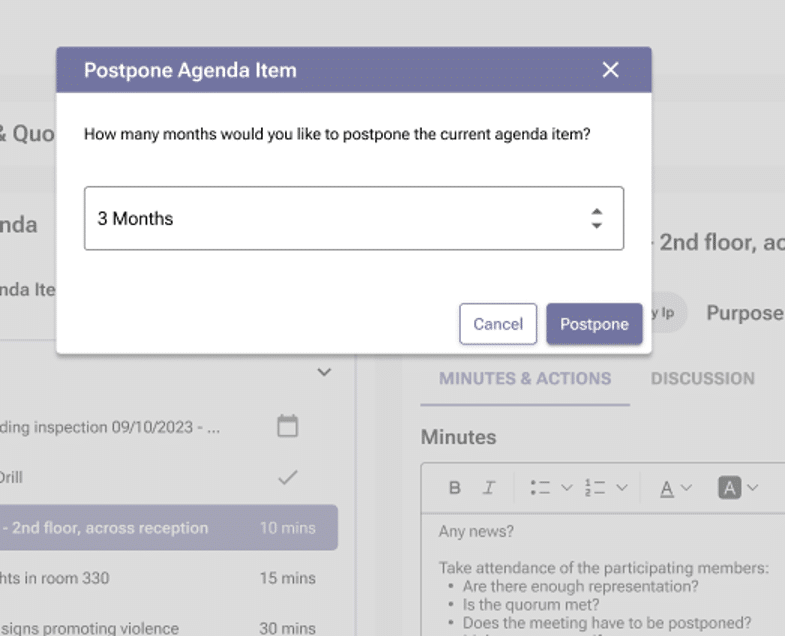
- To postpone an agenda item, click the ‘Postpone’ option at the bottom of the form. A pop-up box will appear.

- In the pop-up box, you will be given an option to choose how many months the item will be postponed. You can only postpone the agenda item for up to 11 months. A 12-month option will be available once the current meeting has been adjourned. Postponing the action item for 1 will be the same as carrying forward to the next meeting functionality.
Note
It is important to note that these decisions and functions can only take place during the meeting and with consensus from the committee members. If the quorum is not met for the meeting, the recorder and attendees will still be able to make decisions (postpone, reject, complete, or carry forward to the next meeting) on an agenda item.
- When the meeting for the postponed action item occurs in the following month, it will automatically be placed into the ‘Old Business’ section. However, if you have postponed the action for more than 1 month (e.g., 3 months), the agenda item will only appear in the ‘Old Business’ section on this date. If needed, you can add it to an earlier meeting.
Carry Forward to Next Meeting
- To carry forward to the next meeting, select the ‘Carry Forward To Next Meeting’ option at the bottom of the form (see below screenshot). Selecting this option will add arrows to indicate that the item has been carried forward (see second screenshot).


- If there are agenda items left undiscussed, or a decision has not been made on it at the end of the meeting, it will automatically be carried forward to the next meeting date.
Complete an Agenda Item
- To close an agenda item that the committee had decided does not need further discussion and is complete, select the ‘Complete’ option at the bottom of the form (see screenshot number 1). When this is selected, the system adds a checkmark to denote that this item has been completed (see screenshot number 2). The text appears when hovering over the ‘Complete’ button.


Adjourn the Meeting
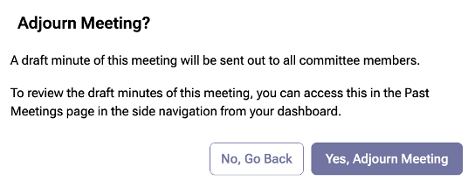
- After reviewing all agenda items, when the meeting time is up, or for any other reason deemed appropriate, select the primary recorder from the drop-down list and click the ‘Adjourn Meeting’ button (see screenshot number 1). If the ‘Adjourn meeting’ button has not been selected at any point during the meeting, the system will automatically adjourn the meeting 24 hours after you click the ‘Start Meeting’ button. In this case, the Primary Recorder field will be left blank in the draft minutes and must be selected on the Edit Minutes screen before publishing the minutes.

- Once you have selected the ‘Yes, Adjourn Meeting’ button, the ‘Meeting Completed’ screen will pop up.
